

More screenshots don’t automatically make a stronger console store page. Choosing screenshots for a console store page means selecting views that show how the game looks and plays, then presenting them in line with the platform’s image requirements. A focused set can communicate more than a collection of similar scenes.
You’re right to think about both the game’s appeal and the technical details: each image should represent the experience accurately, and edits or annotations should support the visuals rather than obscure them. This guide explains how to choose between full-page, visible-area, and selected-area captures, plan a useful sequence, and prepare images for platform requirements. You’ll also learn when captions, UI, logos, or promotional text can help, and how to keep the result polished. If you’re bringing your game to consoles, reserve your slot in our publishing pipeline and let's get started today!
Key Takeaways
- Choose full-page, visible-area, or selected-area captures based on the detail each image needs to communicate.
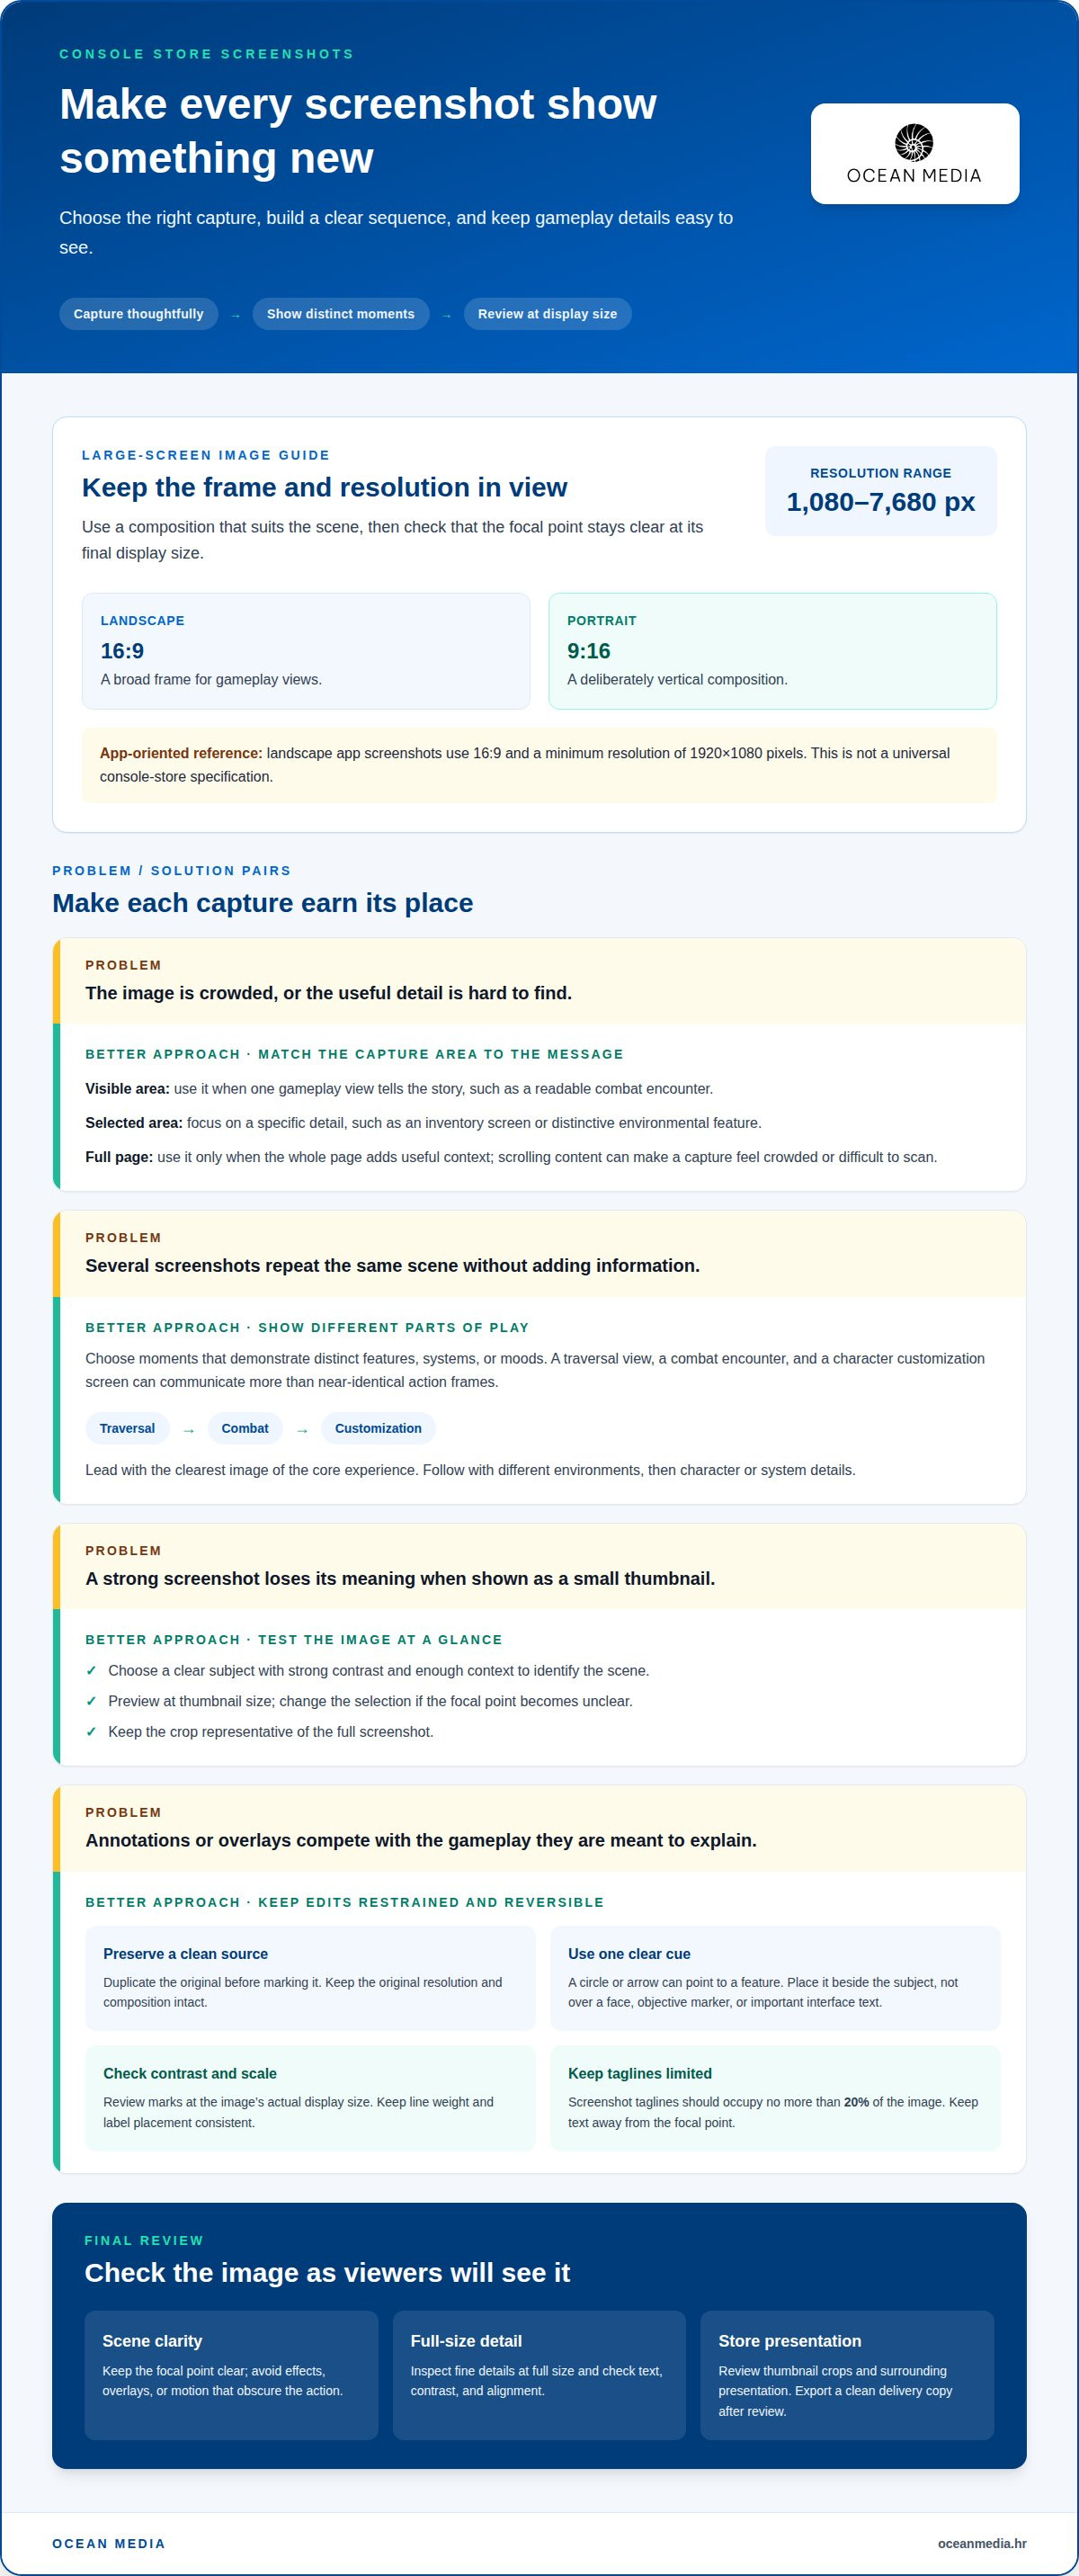
- Prepare large-screen screenshots within the 1,080 to 7,680 px range, and use a 16:9 landscape or 9:16 portrait composition.
- Use highlights and annotations selectively to direct attention without obscuring gameplay or interface details.
- Build a varied sequence of genuine gameplay moments, and keep screenshot taglines to no more than 20% of the image.
- When you’re bringing your game to consoles, reserve your slot in our publishing pipeline and let's get started today!
Full-page, visible-area, and selected-area screenshots
Choose the capture area to match the detail each image needs to communicate. For large-screen screenshots, use a 16:9 landscape or 9:16 portrait composition and keep the resolution within 1,080 to 7,680 pixels.
For a compelling store page, lead with the clearest image of the game’s core experience, then order screenshots to reveal distinct modes, environments, and features. Choose a thumbnail that remains readable at a glance and represents the game accurately.
-
Choose a Screenshot Viewing Area
Capture the visible area when a single gameplay view delivers the message, such as a character in a readable combat encounter. Select a specific area when you need to emphasize a detail, like an inventory screen or a distinctive environmental feature. Use a full-page capture only when the entire page contributes useful context; otherwise, scrolling content can make the image feel crowded or difficult to scan.
Before capturing, display the game on the target screen and frame the intended subject. Check that important interface elements remain visible and that menus, overlays, or cursor details don’t distract from the scene. For large-screen images, a 16:9 landscape frame suits a broad gameplay view, while 9:16 portrait can accommodate a deliberately vertical composition. Keep the game’s focal point clear at the final display size.
-
Select Content and Gameplay Moments
Select screenshots that demonstrate different parts of the playable experience, rather than repeating one scene with minor changes. For example, pair a traversal view with a combat encounter and a character customization screen. Each capture should communicate a distinct feature or mood, giving viewers a more useful sense of the game than several near-identical action frames.
Choose moments that show the game in context: characters interacting with environments, recognizable gameplay systems, and compositions that make the action easy to understand. Check the resolution and inspect fine details at full size before choosing a final capture. Recommended landscape screenshots for apps use a 16:9 aspect ratio and a minimum resolution of 1920x1080 pixels; treat that as an app-oriented reference, not a universal console-store specification. Avoid scenes where effects, interface layers, or motion obscure the central action.
-
Arrange Screenshots and Choose Thumbnails
Arrange the sequence so the first image introduces the game’s strongest visual idea and later captures expand on it. Follow a readable progression, such as a signature gameplay scene, a different environment, then a character or system detail. Don’t place several similar views together; visual variety helps each screenshot add new information.
Choose a thumbnail with a clear subject, strong contrast, and enough context to identify the scene when displayed small. Preview the image at thumbnail size, then change the selection if its focal point becomes unclear. Keep the most distinctive moment near the beginning, and avoid a dramatic crop that misrepresents the full screenshot. A useful sequence balances immediate visual impact with specific evidence of what players can do.
Drawing on and highlighting screenshots
Use annotations to direct attention, not replace what the game actually shows. A clean source image, restrained marks, and a final review help screenshots stay clear across store displays.
- Keep an untouched source image before adding marks. Duplicate the original, then edit the copy so you can remove annotations without losing the captured scene. For example, preserve a clean combat screenshot before highlighting its targeting interface. This also lets your team compare the marked image with the actual game view.
Use a consistent file-naming pattern, such as “combat-clean” and “combat-callout,” to distinguish versions. Keep the original resolution and composition intact while editing. If the screenshot later needs a different crop, return to the clean source instead of rebuilding the image.
- Choose one visual cue for each image, such as a circle around a menu feature or an arrow pointing to a distinctive object. Place the mark beside the subject rather than over it. A callout covering a character’s face, an objective marker, or important interface text makes the screenshot harder to understand.
Use contrast that remains legible against the scene. A bright outline can disappear against explosions, while a dark one may vanish in a shadowed section. Review each annotation at the image’s actual display size, not only while zoomed in. Keep line weight and label placement consistent across the image set.
- Limit promotional text and graphic overlays. Screenshot taglines should not occupy more than 20% of the image. Keep a short phrase away from the action’s focal point, and remove decorative elements that compete with gameplay. One well-placed label can clarify a feature; several labels can make a game image resemble an advertisement.
Separate descriptive notes from claims the screenshot cannot demonstrate. For example, a label can identify a displayed mode, but shouldn’t imply an unshown feature. Check spelling, contrast, and alignment before exporting. Review the full image and each marked section to ensure no text or graphic is clipped.
- Inspect the final images in the context where viewers will see them. If reviewing a store webpage in Chrome, capture the visible area and inspect the entire page by scrolling. This helps reveal whether a thumbnail crop, overlay, or surrounding section changes how the image reads. A webpage review is a presentation check, not a substitute for the original game capture.
Keep annotations editable until the final review, then export a clean delivery copy. Confirm that the selected image still shows the intended gameplay and that each mark points to a visible detail. For teams bringing a game to consoles, a deliberate image review can fit into the broader publishing preparation.
How many screenshots can a console store page include?
There isn’t one universal screenshot count for every console store page. The platform’s submission rules determine the available image slots, while your game’s distinct features determine how many images are useful.
- Separate the platform maximum from the number your page needs. Treat the maximum as an upload boundary, not a target. A store page with several distinct modes may benefit from more variety than a focused, single-mode experience. For example, a racing game could use separate images for track action, vehicle selection, and customization, if its store listing allows those captures.
Start by identifying the platform and store page for each release. Record the permitted screenshot slots for each submission, since one platform’s rules don’t automatically apply to another’s. Avoid planning around a count borrowed from a different console store.
- Build a candidate set around distinct information. Give each image a clear purpose, such as showing exploration, combat, a user interface, or a different environment. If two screenshots communicate the same feature from nearly identical angles, keep the stronger one. This ensures every slot contributes something new instead of using the page’s capacity on repetition.
For example, compare two combat captures side by side. If both show the same enemy encounter and interface, choose the clearer frame and use the other slot for another gameplay system.
- Prioritize images before filling every available slot. Place the strongest, most representative capture first, followed by images that expand the viewer’s understanding. A useful sequence might move from a signature gameplay scene to a new environment, then to a character or customization view. Don’t include a weaker image simply because an upload slot remains open.
Review the sequence as a set. If the first captures already communicate the core experience, later images should add meaningful detail rather than repeat the mood or composition.
- Keep a platform-specific image inventory during submission preparation. Label each candidate by content and intended store page, such as “exploration,” “combat,” or “inventory.” This makes it easier to identify duplicates, replace an outdated capture, and track which image fills each permitted slot.
If a game update changes its interface or visual presentation, revisit the affected screenshots. An image showing an older menu beside current gameplay can make the page feel inconsistent. Replace only captures that no longer represent the submitted build.
- Finalize the count after reviewing the platform’s submission fields and your selected sequence. Use every image only when it adds a distinct, accurate view of the game. If the available slots exceed your useful candidates, submit the stronger set rather than padding it with redundant captures.
Before delivery, confirm that each selected image belongs to the intended platform listing and reflects the current game build. This final pass aligns the upload count with both the store’s allowed capacity and the value each screenshot contributes.
What content and gameplay moments should screenshots show to attract buyers?
Build a set that shows what players actually do, not only the game’s visual style. Choosing screenshots for a console store page starts with scenes that make the core experience clear and show meaningful variety.
- Lead with a representative moment from the core gameplay loop. Show the player performing a defining action, such as solving an environmental puzzle or steering through a crowded city. The interaction should be understandable without added explanation. Prioritize active gameplay over a title screen or cinematic frame that reveals little about play.
Inspect the composition at store-page size. Keep the playable character, key object, or immediate objective easy to find. If effects or background details compete with that focal point, choose a clearer frame from the same sequence.
- Show how the game changes across its environments. Pair contrasting settings, such as an open, sunlit region and a close, atmospheric interior. Each scene should offer a distinct visual read rather than repeating the same composition against different scenery.
Include environmental details that support the experience, such as traversal routes, interactive objects, or landmarks. A dense city capture becomes more informative when the player’s path or activity remains visible.
- Represent meaningful systems through images captured during play. A strategy game might show a readable battlefield and unit interface; a role-playing game could feature equipment selection or a dialogue choice. Choose moments where the system is legible, not obscured by overlapping menus.
Use interface captures selectively. A map, inventory, or skill screen can clarify how a feature works, but should complement gameplay views. Keep visible text readable at display size, and provide enough context to explain a menu’s purpose.
- Include character and narrative moments when they communicate the game’s identity. A distinctive character interacting with another figure can suggest tone and relationships. For an adventure game, choose a story scene that also reveals its setting or player context.
Keep narrative captures faithful to the playable experience. Dialogue-heavy frames may lose impact when small text becomes unreadable. An expressive character or clear story situation can convey atmosphere without requiring viewers to read every line.
- Review the complete set for variety and accuracy before final selection. Ask what each image adds: a mechanic, setting, character, or mood. If two captures answer the same question, keep the clearer one and use the other slot to reveal another part of the game.
A useful test for choosing screenshots for a console store page is whether every scene reflects the current build and actual player experience. Avoid staged images that imply unavailable actions. Authentic moments give viewers a clearer sense of what the game offers.
Should screenshots include captions, UI, logos, or promotional text?
Keep the game image in control. Add text or graphics only when they clarify a visible feature, and preserve enough space for the gameplay itself.
- Use captions to identify details a viewer might otherwise miss. A short label such as “Co-op mode” can clarify a visible multiplayer scene. Keep the words brief and place them beside, not over, the main action. A caption should explain what the image shows, not make a claim the image cannot support.
Preview each caption at the image’s final display size. If a phrase becomes difficult to read, shorten or remove it. Avoid adding descriptive copy to every screenshot; a clean image often communicates more effectively than repeated labels.
- Retain the game’s UI when it helps explain the experience. A map, health display, or equipment menu can show how players interact with a system. Choose a capture where the interface is legible and supports the scene. Remove distracting overlays only when the image still accurately represents actual gameplay.
Compare the UI with the scene around it. A bright menu over a dark environment may draw attention away from the action. For a strategy game, an interface-led image may be useful; for a cinematic platformer, an uncluttered gameplay view may work better.
- Use logos with restraint. A game logo can help identify the title, but shouldn’t obscure characters, interface details, or environmental features. Keep branding consistent across the image set, and avoid decorative marks that compete with the game’s visual identity.
Review each logo placement against both light and dark parts of the scene. A logo that disappears over a bright sky may need a clearer position. Preserve the underlying screenshot so you can compare the edited version with the original capture.
- Limit promotional text to a concise, relevant message. Screenshot taglines should not occupy more than 20% of the image. A short phrase can emphasize a visible feature, but multiple claims or large text blocks can overwhelm the gameplay. Keep the image focused on what players will actually see.
Check every phrase against the screenshot itself. A tagline about exploration fits a visible landscape and traversal route. A claim about a mode or feature shouldn’t appear on an image that gives viewers no visual evidence of it.
- Review the complete set after editing. Compare annotated and clean versions, then remove captions, logos, or graphics that repeat information. Check spelling, contrast, alignment, and whether any text covers a focal point. This final pass keeps the image sequence cohesive and readable.
If you’re preparing screenshots as part of bringing your game to consoles, connect image decisions with your wider publishing preparation. Keep the submitted visuals consistent with the game and its store presentation.
Ocean Media: Console Game Publishing
Ocean Media provides console game publishing for developers, helping them navigate the technical and administrative complexities of console submissions. Once your screenshots are selected, edited, and aligned with your store presentation, publishing support can connect those assets with the wider release process. It’s a natural next step when you’re preparing to bring your game to consoles and need guidance across the publishing pipeline.
Work with a publishing partner to move from asset preparation toward platform submission with a clear process. If you’re ready to discuss your release, contact Ocean Media, reserve your slot in our publishing pipeline and let's get started today!
Move Your Console Release Forward
Your store page is part of the first impression players have of your game. A thoughtful approach to choosing screenshots for a console store page helps ensure the visuals reflect the experience you want to bring to players. Treat the final image selection as one part of release preparation, aligned with the build and the wider platform submission process.
When you’re ready to move from preparation toward release, Ocean Media’s Console Game Publishing can help you navigate the technical and administrative complexities of console submissions. Start a conversation with Ocean Media about your store page and publishing needs.
Contact Ocean Media, reserve your slot in our publishing pipeline and let's get started today! Your next milestone can start with a clear plan for bringing your game to consoles.
Frequently Asked Questions
What screenshot requirements do PlayStation, Xbox, and Nintendo eShop have for store pages?
PlayStation, Xbox, and Nintendo eShop use platform-specific submission requirements, so one shared checklist won’t cover every store page. Requirements can depend on the destination platform and the media slot being submitted. Treat each listing as its own asset package: map every screenshot to its intended storefront, then prepare it against that platform’s current submission fields. This helps prevent applying one console’s image settings to another.
What image dimensions, aspect ratios, file formats, and file-size limits are required?
There isn’t one universal set of dimensions, formats, and file-size limits for all console storefronts. A broad large-screen reference is 1,080 to 7,680 pixels, with 16:9 landscape or 9:16 portrait composition, but don’t assume those figures define a console’s submission specification. App-oriented landscape guidance recommends 1920x1080 pixels; that is not automatically a console requirement. Match each file to its intended submission field.
What are common reasons console store screenshots get rejected?
Submission problems can arise when an image doesn’t meet its platform’s technical settings or fails to represent the game accurately. Common quality-control risks include a file assigned to the wrong media slot, unreadable interface text, an outdated build, or overlays that obscure gameplay. For example, a screenshot showing an older menu may conflict with the current release. Review each asset against its destination and build before submission.
How do console store screenshot rules differ by platform and region?
Platform rules differ because PlayStation, Xbox, and Nintendo eShop have distinct submission processes and media fields. Regional listings may also need assets suited to their intended audience, especially when visible text appears in an image. For example, a screenshot containing English interface text may not fit a listing prepared for another language. Organize assets by platform and target region, and keep regional variants clearly identified to avoid mismatched submissions.


